Is Seven Nation Army hard for beginners?
Not really.
It’s actually considered one of the easiest famous guitar riffs because the movement is repetitive and beginner-friendly.

Some guitar riffs sound cool…
But very few make complete beginners immediately feel like: “I’m actually playing a REAL song.”
That’s exactly why so many new players love Seven Nation Army.
The riff sounds powerful, recognizable, fun to repeat, and surprisingly impressive even when played slowly.
And my favorite part?
It’s actually much easier than most people expect, and it’s also very good practice for finger positioning and playing two strings at the same time for other songs later on.
Take your time and think of it as practice for transitioning between positions. It’s completely okay if you’re not good on day one. You will improve over time. It’s like building muscle memory every day.

Yes! Beginners can absolutely learn Seven Nation Army early on.
It’s one of the most beginner-friendly famous guitar riffs because:
You do NOT need:
Just focus on:
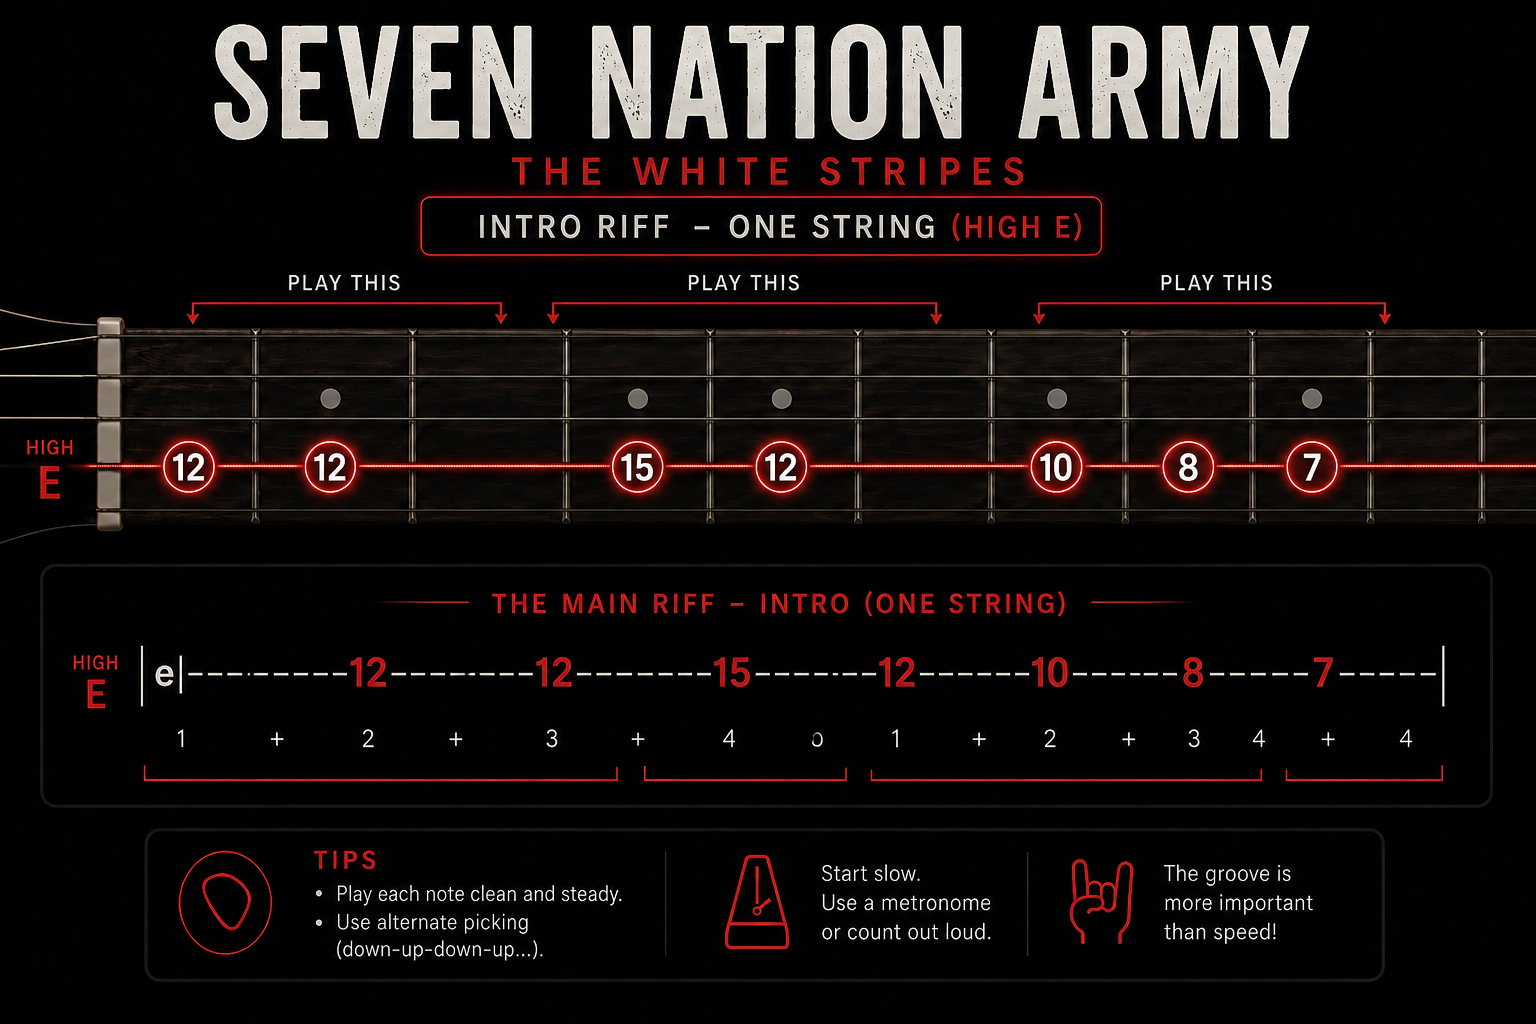
This is the iconic Seven Nation Army riff. Start reading and playing the tab from left to right.
There are many ways to play this riff, but we will use this version because it stays closer to the original while still allowing beginners to start with one finger and learn the movement more comfortably at first.
If you don’t know how to read guitar tabs yet, here’s a simple beginner guide to help you understand them and start playing riffs more easily: How to Read Guitar Tabs for Complete Beginners
e|-----------------------------
B|-----------------------------
G|-----------------------------
D|-----------------------------
A|-----------------------------
E|-12–12–15–12–10–8–7
Then we will move to the 3rd fret.
e|-----------------------------
B|-----------------------------
G|-----------------------------
D|-----------------------------
A|-----------------------------
E|-3–3–3–3–3–3–3–3–5–5–5–5–5–5–5
Then we will add another finger together to create power chords.
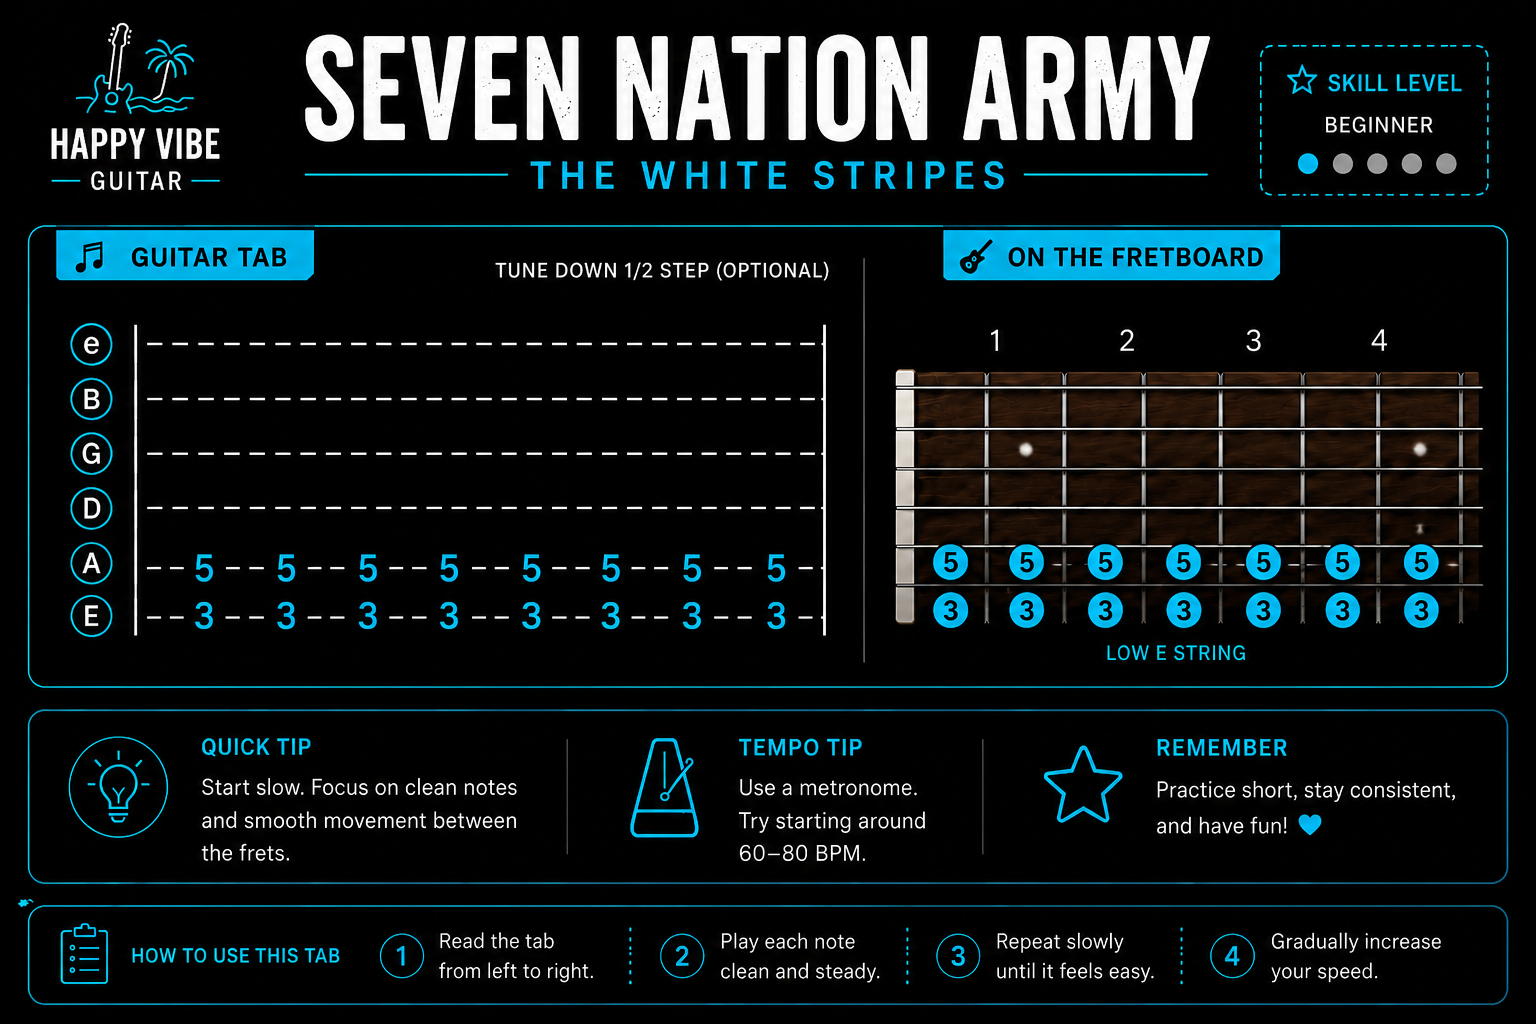
e|-----------------------------
B|-----------------------------
G|-----------------------------
D|-----------------------------
A|--5–5–5–5–5–5–5–5
E|--3–3–3–3–3–3–3–3
Use these finger position:
Here, focus on strumming only the E and A strings.
Then keep your fingers in the same position, but move the shape to frets 5 and 7.
e|-----------------------------
B|-----------------------------
G|-----------------------------
D|-----------------------------
A|--7–7–7–7–7–7–7–7
E|--5–5–5–5–5–5–5–5
Here again, focus on strumming only the E and A strings.
Use these finger position:
Here, focus on strumming only the E and A strings.
And now we will do the same thing we did at the beginning, but with the two-finger for a power chord shape.
Variation One:
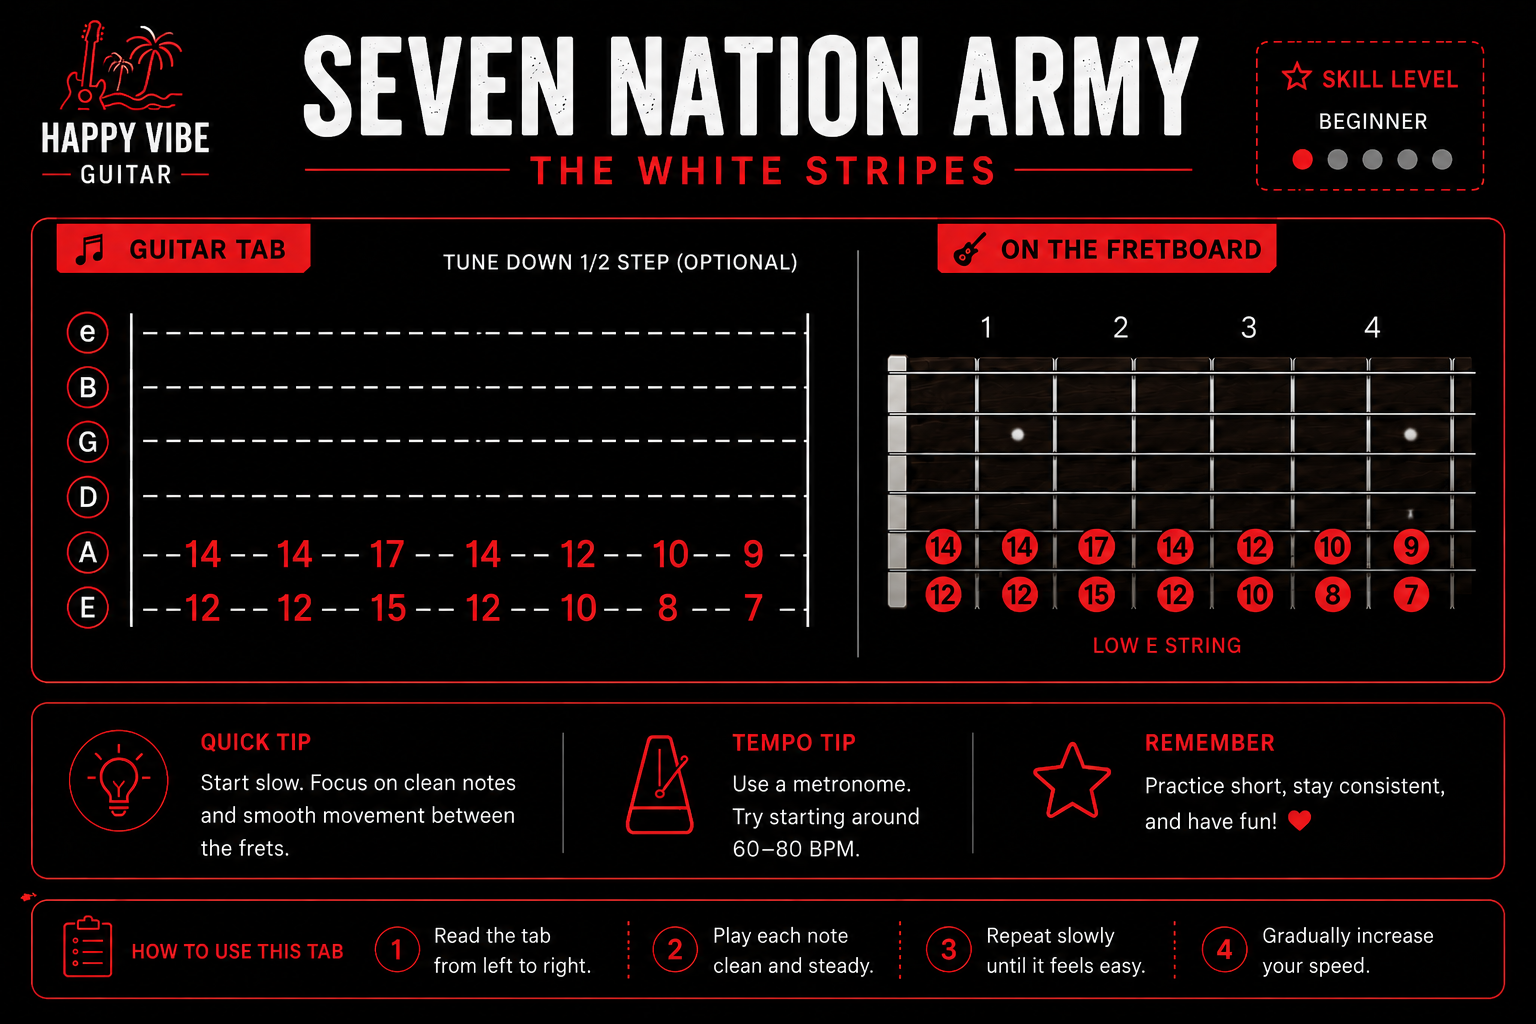
e|-----------------------------
B|-----------------------------
G|-----------------------------
D|-----------------------------
A|--14–14–17–14–12–10–9–
E|--12–12–15–12–10–8–7
Here, focus on strumming only the E and A strings.
Use these finger position:
Keep the same finger positions and simply move them across the frets.
Example:
Index finger → fret 12 to fret 15
Ring finger → fret 14 to fret 17
Variation Two:
e|-----------------------------
B|-----------------------------
G|-----------------------------
D|-----------------------------
A|--14–14–17–14–12–14–12–10–9
E|--12–12–15–12–10–12–10–8–7
Here, focus on strumming only the E and A strings.
Use these finger position:
Keep the same finger positions and simply move them across the frets.
Example:
Index finger → fret 12 to fret 15
Ring finger → fret 14 to fret 17
And you simply alternate between these power chords and the shapes from frets 3–5–7 from before.
Do NOT try to match the original song speed immediately.
Also remember: in the real song there are effects and details you will learn eventually. For now, keep it simple and easy.
A lot of beginners rush too early and then:
Slow practice is MUCH better than messy fast practice.
Make sure every note sounds clear.
Try not to press the strings extremely hard and stay relaxed while playing.
Over time your fingers naturally become more comfortable.
The biggest challenge for beginners is usually moving smoothly between frets.
12–12–15–12–10–8–7
Once that movement starts feeling easier, the riff becomes much more comfortable to play with more fingers for the transitions.
Even if you play the correct notes, the riff will sound strange if the rhythm feels rushed.
Try:
Consistency matters more than speed.
One of the biggest reasons beginners quit guitar early is because practice often starts feeling disconnected from real music.
Yes, music theory is important and useful over time, but learning guitar should also feel fun and exciting. After all, we are here to PLAY music, aren’t we?
A lot of people spend weeks:
without ever feeling like they are actually playing songs.
But recognizable riffs completely change that feeling.
Suddenly:
And honestly, Seven Nation Army is one of the BEST examples of that.
Even simple progress on this riff can make beginners feel: “I can actually do this.”
Not really.
It’s actually considered one of the easiest famous guitar riffs because the movement is repetitive and beginner-friendly.
No.
Distortion helps capture the original vibe, but beginners can still practice the riff clean perfectly fine. Remember to keep it easy and simple at first, later you will get there.
A lot of beginners can start recognizing the riff within their first few practice sessions.
The biggest improvement usually comes from rhythm consistency over time.
Honestly, both are useful.
But recognizable riffs often help beginners stay motivated because they immediately sound musical and rewarding.
Learning guitar should feel:
Not stressful or overwhelming.
That’s why riffs like Seven Nation Army are so powerful for beginners.
Even simple progress on recognizable songs can completely change how motivated you feel about practicing.
And honestly, having fun is one of the biggest reasons people continue learning guitar long term and never forget that.
Join the Happy Vibe Tribe for easy guitar tabs, beginner-friendly riffs, simple practice tips, stress-free guitar advice, and recognizable songs that make learning guitar feel fun from day one.